How to Create a Smooth Animated Notice Board Using HTML, CSS & JavaScript
By Raja Babu Mahato • Frontend Animation Series
Every website — whether a school, college, or corporate dashboard — often needs a space to display updates or important information.
That’s where a Notice Board comes in. But instead of static text, what if your notices smoothly scroll upwards, like a digital display screen?
In this tutorial, we’ll build a beautiful animated notice board from scratch using only HTML, CSS, and JavaScript. You’ll see it scroll automatically, pause on hover, and even highlight new notices automatically. ?
Let’s break it down step by step.
Step 1: Setting Up the HTML Structure
We’ll begin by writing the basic HTML layout. Our goal is to create a section for the notice board and list all notices inside it.
<section id="notice-board">
  <h3>Notice Board</h3>

  <div class="notice-board">
    <div class="notice-list">
      <div class="notice-item" data-date="2025-11-03">
        <div><strong>2025-11-03</strong> - School reopening notice</div>
      </div>
      <div class="notice-item" data-date="2025-10-29">
        <div><strong>2025-10-29</strong> - Parent meeting schedule</div>
      </div>
      <div class="notice-item" data-date="2025-10-26">
        <div><strong>2025-10-26</strong> - Annual sports registration open</div>
      </div>
      <div class="notice-item" data-date="2025-10-22">
        <div><strong>2025-10-22</strong> - Science exhibition announcement</div>
      </div>
      <div class="notice-item" data-date="2025-10-17">
        <div><strong>2025-10-17</strong> - Holiday on Diwali</div>
      </div>
    </div>
  </div>
</section>
Explanation:
#notice-board— The main container for our section..notice-board— The box that holds all notices..notice-item— Each individual notice, marked with adata-dateattribute so we can detect recent notices later.
Step 2: Styling the Notice Board with CSS
Next, we’ll add modern, clean styling with rounded corners, shadows, and alternating backgrounds. We’ll also define the layout so the scrolling looks smooth.
/* Notice Board CSS */
#notice-board {
  width: 100%;
  display: grid;
  place-items: center;
  background: whitesmoke;
  padding: 20px;
}

#notice-board h3 {
  font-size: 24px;
  margin-bottom: 10px;
  color: #333;
}

.notice-board {
  width: 90%;
  max-width: 900px;
  height: 400px;
  border: 2px solid #ccc;
  border-radius: 10px;
  background: #fff;
  overflow: hidden;
  position: relative;
  padding: 20px;
  box-shadow: 0 0 10px rgba(0,0,0,0.1);
}

.notice-list {
  position: absolute;
  top: 0;
  left: 0;
  width: 100%;
  display: flex;
  flex-direction: column;
  align-items: center;
  transform: translateY(0);
  will-change: transform;
}

.notice-item {
  display: flex;
  justify-content: space-between;
  align-items: center;
  padding: 8px 12px;
  border-bottom: 1px solid rgb(204, 174, 4);
  background: gold;
  margin: 10px 0;
  border-radius: 20px;
  width: 90%;
  font-size: 16px;
  color: #333;
}

.notice-item:nth-child(even) {
  background: #f9f9f9;
}

.new-tag {
  color: red;
  font-weight: bold;
  margin-left: 10px;
}
Explanation:
- The board height is fixed, and overflow is hidden so the content can scroll smoothly.
- We use
flexboxfor vertical stacking. - Every even notice has a lighter background for contrast.
Step 3: Adding Smooth Scrolling Animation with JavaScript
Now comes the fun part — adding life to the board with JavaScript. We’ll make the notices scroll automatically, loop back when finished, and highlight new ones (less than 7 days old).
document.addEventListener('DOMContentLoaded', () => {
  const noticeBoard = document.querySelector('.notice-board');
  const noticeList = document.querySelector('.notice-list');
  if (!noticeBoard || !noticeList) return;

  let speed = 60; // pixels per second

  // Add NEW tag for recent notices
  (function addNewTags() {
    const today = new Date();
    const items = noticeList.querySelectorAll('.notice-item');
    items.forEach(item => {
      const dateStr = item.getAttribute('data-date');
      if (!dateStr) return;
      const noticeDate = new Date(dateStr);
      const diffDays = (today - noticeDate) / (1000 * 60 * 60 * 24);
      if (diffDays <= 7) {
        const div = item.querySelector('div:first-child');
        const tag = document.createElement('span');
        tag.className = 'new-tag';
        tag.textContent = 'NEW';
        div.appendChild(tag);
      }
    });
  })();

  let pos = 0;
  let lastTimestamp = null;
  let animId = null;
  let isPaused = false;

  function startOrReset() {
    cancelAnimationFrame(animId);
    lastTimestamp = null;
    const boardH = noticeBoard.clientHeight;
    pos = boardH;
    noticeList.style.transform = `translateY(${pos}px)`;
    animId = requestAnimationFrame(step);
  }

  function step(ts) {
    if (!lastTimestamp) lastTimestamp = ts;
    const dt = (ts - lastTimestamp) / 1000;
    lastTimestamp = ts;

    if (!isPaused) {
      pos -= speed * dt;
      const listH = noticeList.scrollHeight;
      if (pos <= -listH) pos = noticeBoard.clientHeight;
      noticeList.style.transform = `translateY(${pos}px)`;
    }

    animId = requestAnimationFrame(step);
  }

  // Pause on hover
  noticeList.addEventListener('mouseenter', () => isPaused = true);
  noticeList.addEventListener('mouseleave', () => isPaused = false);

  // Restart on resize
  window.addEventListener('resize', () => startOrReset());

  startOrReset();
});
Explanation:
- requestAnimationFrame() ensures the animation is smooth and efficient.
- The notices scroll upward continuously, and when the list ends, it resets to the bottom.
- Hovering pauses the scroll for readability.
- The script adds a red
NEWlabel to recent notices (within 7 days).
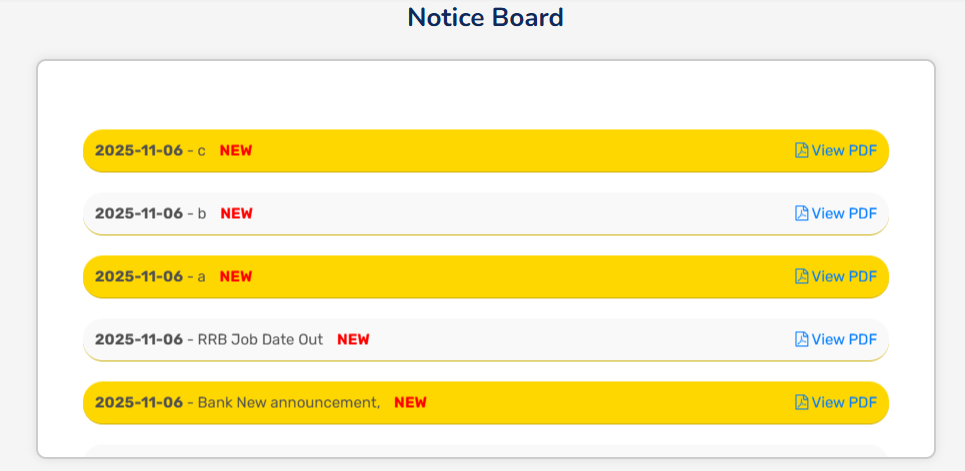
Step 4: Combine Everything for the Final Output
Here’s how your final Notice Board looks when everything is combined:
- Automatic upward scrolling
- “NEW” tag for recent notices
- Pause on hover
- Smooth looping animation
Try this full code in your HTML file and see it in action ?
<!-- Full Working Example -->
<section id="notice-board">
  <h3>Notice Board</h3>
  <div class="notice-board">
    <div class="notice-list">
      <div class="notice-item" data-date="2025-11-03">
        <div><strong>2025-11-03</strong> - School reopening notice</div>
      </div>
      <div class="notice-item" data-date="2025-10-29">
        <div><strong>2025-10-29</strong> - Parent meeting schedule</div>
      </div>
      <div class="notice-item" data-date="2025-10-26">
        <div><strong>2025-10-26</strong> - Annual sports registration open</div>
      </div>
    </div>
  </div>
</section>
Step 5: Final Thoughts
You’ve just built a fully working animated Notice Board — all with pure HTML, CSS, and JavaScript.
- No libraries or frameworks needed.
- Completely responsive and lightweight.
- Easy to integrate with any backend (Laravel, Node.js, etc.).
You can take this project further by connecting it to your backend database, allowing admins to add new notices dynamically.
? Pro Tip:
If you want to make it even smoother, you can use CSS keyframes or Intersection Observer for more advanced animations.
And that’s it — your own Digital Notice Board ready for any website! ⚡

Comments (0)
Leave a Comment